PDML Scripting Examples
|
First Published |
2022-02-07 |
|
Latest Update |
2022-02-10 |
|
License |
|
|
Author |
Christian Neumanns |
|
Website |
|
|
PML Markup Code |
Introduction
This document shows examples of how PDML Script Nodes can be used to simplify and automate many tasks related to creating data and markup documents.
Note
Script Nodes are a work in progress. Chapters planned to be written in the future just contain the text "TODO".
All examples shown in this document have been tested with PDML's reference implementation and/or PML.
Expressions
Consider a PDML document containing a price field like this:
[price 2675.19]
Suppose the price is calculated by the formula 2.7183 * (981 + 3.1416), and the factors in this formula must be updated regularly. We also want the formula to be visible in the PDML document. We could write:
[price 2.7183 * (981 + 3.1416)]
But now the final value 2675.19 isn't directly available anymore. An application reading this node would have to parse and evaluate the formula defined as text.
Not very practical!
A PDML expression solves this problem. We can use an s:exp node and write:
[price [s:exp 2.7183 * (981 + 3.1416)]]
Note how the price formula is simply embedded in an s:exp node ([s:exp ...]):
[price [s:exp 2.7183 * (981 + 3.1416)]]
       ^^^^^^                        ^
Now the PDML parser will evaluate the expression, and the application reading the document will see the price node as if it were written like this:
[price 2675.19211128]Much better. But we still need to get rid of the superfluous decimal digits, and round the result to 2 decimals. We'll do that in the next chapter.
Libraries
Standard Javascript Library
Instead of having the evaluation of the price expanded to 2675.19183945 we now want to round the price to 2 decimals. We can do this with the standard Javascript function toFixed:
[price [s:exp (2.7183 * (981 + 3.1416)).toFixed(2)]]
Now the node expands to [price 2675.19].
Standard PDML Library
Suppose that instead of expanding to 2675.19, we would like to add a thousands separator, so that the price expands to 2,675.19, which is more readable for humans.
While there are some solutions to do that in Javascript, it is not trivial to do it in a reliable, portable way (as shown in this Stackoverflow question). Instead of using a standard Javascript function we can use a standard PDML function that allows us to provide a specific format, and also rounds to the number of decimal places specified in the format. We'll use function formatFloat defined in object numberUtils:
[price [s:exp numberUtils.formatFloat ( 2.7183 * (981 + 3.1416), "###,###,##0.00")]]
Result: [price 2,675.19].
User-Defined Library
If we have several price nodes in our document, it quickly becomes cumbersome and error-prone to write the above code. We can therefore define a function in an s:def node:
[s:def
    ~~~
    function roundPrice ( price ) {
        return numberUtils.formatFloat ( price, "###,###,##0.00" );
    }
    ~~~
]
Now we can use function roundPrice again and again in price nodes. For example:
    [price [s:exp roundPrice ( 2.7183 * (981 + 3.1416) )]]
    ...
    [price [s:exp roundPrice ( 123 * 321 )]]
... which expands to:
[price 2,675.19]
...
[price 39,483.00]
Shared Library
If we need the function in other documents too, we can save the above s:def node in a file:
[s:def
    ~~~
    function roundPrice ( price ) {
        return numberUtils.formatFloat ( price, "###,###,##0.00" );
    }
    ~~~
]
Then we can import the library at the beginning of the document with a u:ins_file node (using a relative file path), and use the function as before:
    [u:ins_file path=resources/libraries/myPriceLibrary.def]

    [price [s:exp roundPrice ( 2.7183 * (981 + 3.1416) )]]
    ...
    [price [s:exp roundPrice ( 123 * 321 )]]
Note
A library file like the above one is not limited to one function. We could of course add other useful functions, and maybe also some commonly used constants. Then we could share the library in a public repository like Github, Gitlab, etc.
For more information about libraries please refer to Javascript Support.
Automated Text Updates
Script nodes are often useful to automatically update text snippets in a document.
For example, consider a web article that needs to be updated regularly. At the beginning of the article the following meta data are displayed:
First published: 2021-07-06
Latest update: 2022-01-10
Each time a new version is published, we would have to manually change the Latest update field. This is cumbersome and error-prone. It should be done automatically.
We can do this by using an expression node:
Latest update: [s:exp timeUtils.currentLocalDate()]Now the date is updated whenever the document is parsed.
Note
The above function applies the ISO 8601 standard to format the date (i.e. YYYY-MM-DD). timeUtils provides other functions to get a specifically formatted date, time, or date/time pair.
For example, if we wanted to also display the time (without seconds) we could use function currentLocalDateTimeMinutes. That function would return text like this: 2022-01-10 14:16
Instead of using an expression node, we could also use a s:script node that calls function doc.insertText:
Latest update: [s:script doc.insertText ( timeUtils.currentLocalDate() );]Note
The above approach to update Latest update might not be appropriate, because the date is updated each time the document is parsed, even if there are no real changes in the document.
A better approach would therefore be to scan the list of files used to create the document and retrieve the timestamp of the file with the most recent modification date.
One way to realize this would be to call an external program or OS script that provides the most recent timestamp. We'll later see how to call external programs and OS scripts.
A dedicated PDML library function to make this super-easy might be added in the future.
Retrieving Text And Data
In this chapter we'll see how to retrieve text and data from external resources, and then insert them into the document.
Consider a versioned software application project. The application's documentation is composed of several PML documents (note: PML uses the PDML syntax). Ech document displays the application's version number at the beginning of the document, like this:
Version: 7.4.0Hence, each time a new version of the application is published, the version number must be updated manually in all documents. This is cumbersome and error-prone, again. It's also a clear violation of the important Don't repeat yourself (DRY) principle. That is, unless we use script nodes.
Script nodes allow us to automatically retrieve the version number from a single resource and insert it in the documents at parse-time.
In the following chapter we'll see how to retrieve the version number from a variety of different resources.
File
Suppose the version number is stored in a file:
7.4.0To retrieve a file's text content we can use function fileUtils.readText. So we have to replace:
Version: 7.4.0... with:
Version: [s:exp fileUtils.readText ( "path/to/application/version.txt" )]Note
The file's path can be absolute or relative. If it's relative, it's relative to the current working directory.
URL
To retrieve the version number from a URL, we can write:
Version: [s:exp URLUtils.readText ( "http://www.example.com/version.txt" )]OS Environment Variable
The version number could also be retrieved from an environment variable of the operating system:
Version: [s:exp OSEnvUtils.getVar ( "MY_APP_VERSION" )]User Input
If the running application has a console, the version number can be asked in the console:
Version: [s:exp OSConsole.askString ( "Please enter version number: " )]After the user has typed the version number, the console looks like this:
Please enter version number: 7.4.0
Alternatively, the version number can be asked in a GUI:
Version: [s:exp GUIUtils.askString ( "Please enter version number: " )]A GUI dialog like the following one will be displayed:
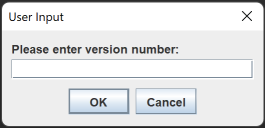
Note
Displaying GUI dialogs works even if the application is run as a command line application.
JSON document
Suppose we have a JSON config file like this:
{
    "color": "green",
    "version": "7.4.0",
    "width": 100
}
We can retrieve the version field from the config file and insert it in the document with a s:script node:
[s:script
    ~~~
    const JSONString = fileUtils.readText ( "config.json" );
    const JSONData = JSON.parse ( JSONString );
    const version = JSONData.version;
    doc.insertText ( `Version: ${version}` );
    ~~~
]
Alternatively, we could write more compact, but slightly less readable code by using an expression:
Version: [s:exp JSON.parse ( fileUtils.readText ( "config.json" ) ).version]PDML document
TODO
XML document
TODO
External Program
Suppose that the version number is stored in a resource that would be difficult or impossible to access with Javascript. For example, the version number could be stored in a field of a database table, or in some source code file that must be parsed to retrieve the version number.
In such cases we can write an external program (written in any programming language) that retrieves the version number, and writes it to STDOUT, or to a file. Then, in the PDML document we just need to execute that program, get the version number from STDOUT, and insert it into the document. We can call OSCommand.textPipe in a simple expression node to achieve this:
Version: [s:exp OSCommand.textPipe ( \[ "path/to/my_app.exe", "--arg1", "foo" \], null )]To test this out on Windows, you could create file my_app.bat with the following content:
@echo off
echo 7.4.0
You can then execute that batch file with:
Version: [s:exp OSCommand.textPipe ( \[ "my_app.bat" \], null )]... which will expand to:
Version: 7.4.0Note
Characters [ and ] must be escaped in the above Javascript code. We can use an alternative syntax to eliminate the need for escaping in source code:
Version: [s:exp
    ~~~
    OSCommand.textPipe ( [ "my_app.bat" ], null )
    ~~~
]
Please refer to chapter Syntax for more information.
A real-life example to demonstrate the power of executing external programs will be shown later in chapter Executing OS Programs.
OS Script
Besides executing an external program, we can also execute an OS script to retrieve the version number. The following code illustrate how to do this on Windows:
Version: [s:exp WinCmdUtils.getInstructionsOutput ( "@echo off && echo 7.4.0", null, null )]This expands to:
Version: 7.4.0More examples about running OS scripts on Windows or Linux will be shown in Executing OS Scripts.
Command Line Argument
TODO
Creating Text And Data
Script nodes can be used to auto-generate text and/or data that would be cumbersome to create manually.
Suppose we want to display compound interest tables like the following one in a PML document.
Initial amount: 100
Interest rate: 1.5%
| Years | Amount |
|---|---|
| 0 | 100 |
| 1 | 101.50 |
| 2 | 103.02 |
| 3 | 104.57 |
| 4 | 106.14 |
| 5 | 107.73 |
The above table could be created with the following PML code:
Initial amount: 100

Interest rate: 1.5%

[sim_table (halign="R,R")
    ~~~
    Years | Amount
    -
    0 | 100
    1 | 101.50
    2 | 103.02
    3 | 104.57
    4 | 106.14
    5 | 107.73
    ~~~
]
Writing code like this manually quickly becomes boring and error-prone, especially if there are many such tables with different interest rates and many years to display.
The solution is to write a function to automagically generate the PML code. As seen already, functions are defined within a s:def node. Let's also store this function in an external file, so that it doesn't distract in the PML document, can be reused in other documents, and shared with other people. The file looks like this:
[s:def
    ~~~
    function interestTable ( initialAmount, interestRate, years ) {

        let code = `    Initial amount: ${initialAmount}

        Interest rate: ${interestRate}%

        [table_data (halign="R,R")
            Years | Amount
            -
        `;

        var year = 0
        var amount = initialAmount
        for ( let year = 0; year <= years; year++ ) {
            const formattedAmount = numberUtils.formatFloat ( amount, "###,###,###,##0.00" );
            code = code + `    ${year} | ${formattedAmount}
        `;
            amount = amount * ( 1 + interestRate / 100 );
        }

        code = code + "table_data]";

        // can be uncommented for debugging
        // stdout.writeLine ( code );

        return code;
    }
    ~~~
]
We're not going to delve into the details of this code. It should be self-explanatory for Javascript programmers.
The above table can now be inserted in a PML document with the following code:
[u:ins_file path=interestUtils.def]

[s:exp interestTable ( 100, 1.5, 5 )]
If we want to insert more tables with different parameters, we just need to insert more s:exp nodes. For example, the following code will generate an additional table for an initial amount of 10,000, an interest rate of 0.9%, and a period of 20 years:
[s:exp interestTable ( 10000, 0.9, 20 )]Customizing Syntax
Whenever you want to simplify or customize the syntax in PDML documents, you can consider using script nodes.
Let's look at an example of syntax customization in PML.
Suppose we need to insert many icons that all must have the same dimensions, and a border. Using standard PML, the code would look like this:
[image source="icon_1.png" width=64 height=64 border=yes]
...
[image source="icon_2.png" width=64 height=64 border=yes]
Needless to say, nobody enjoys writing code like this again and again. The code is challenging to maintain, and clearly violates the important Don't repeat yourself (DRY) principle.
To eliminate the pain we can write a function that inserts the PML code for us:
[s:def
    ~~~
    function icon ( path ) {
        doc.insert ( `[image source="${path}" width=64 height=64 border=yes]` );
    }
    ~~~
]
Now we can easily insert icons with the following code:
[s:exp icon("icon_1.png")]
...
[s:exp icon("icon_2.png")]
The code is now DRY and easy to maintain.
It expands to:
[image source="icon_1.png" width=64 height=64 border=yes]
...
[image source="icon_2.png" width=64 height=64 border=yes]
We could add more arguments to function icon and do whatever we need to do with them, using the full power of a scripting language. For example, we could add argument borderColor to auto-insert inline CSS that defines the color of the icon's border, and sets the width to 3 pixels:
[s:def
    ~~~
    function icon ( path, borderColor ) {
        doc.insert ( `[image source="${path}" width=64 height=64 html_style="border: 3px solid ${borderColor};"]` );
    }
    ~~~
]
Now, this code:
[s:exp icon("ok.png", "green")]

[s:exp icon("not_ok.png", "red")]
... would be rendered like this in the browser:
Conditional Text Blocks
Sometimes it is necessary to produce different editions of the same document, depending on the target audience, or other factors.
For example, an exam paper printed for students contains only questions, while the teachers' edition also contains the answers.
Here is a simple PML example to illustrate how this can be achieved.
[doc [title Conditional Text Test]

    [s:def const forTeachers = false;]

    Question: What is the answer?

    [s:script
        ~~~
        if ( forTeachers ) {
            doc.insertText ( "Answer: The answer is 42." );
        }
        ~~~
    ]
]
When forTeachers is set to true (as in the code above), the document's content will be:
Question: What is the answer?

Answer: The answer is 42.
When forTeachers is false the answer will not be printed:
Question: What is the answer?
Note
In a real-world scenario, the value of forTeachers would probably not be hard-coded in the document, but it would be retrieved from an external resource. Examples of how to do that are shown in chapter Retrieving Text And Data.
Executing OS Programs
The most powerful feature of script nodes is the ability to run external programs and OS scripts. A dedicated API makes it very easy to:
-
run any installed program written in any programming language
-
optionally provide command line arguments to the program
-
optionally provide a string that is the application's input, read from its standard input device (stdin)
-
optionally retrieve the application's output written to stdout (or to a file), and insert it into the PDML document, or do whatever else needs to be done with the application's output
Here are a few examples of what can be achieved, just to wet your appetite:
-
Use your preferred programming language, or an existing tool, to fetch data from an Excel sheet, a server, a local/remote database, or a webservice, then transform the data to a summary table and insert the result into the PDML document.
-
Use Python to execute a deep learning algorithm and explore the result in the PDML document.
-
Use a media creator application to create image, audio, and video files, and insert links to them in the PDML document. For example: use PlantUML to insert diagrams, or abc notation to insert music notes, or a text-to-speech application to insert audio files.
-
Use a source code highlighter that reads source code (or source code snippets) from a source code repository, and insert a highlighted version of the source code into the PDML document.
-
Execute a VB or OS script to send an email and add a log entry each time a new version of a document is published.
To illustrate how it works, let's use PlantUML to dynamically create diagrams and insert links to them into a PML markup document.
PlantUML is an open-source tool you can use to create many different kinds of diagrams from plain text languages. For example, this plain text:
@startuml
Alice -> Bob: Hello
Bob -> Alice: Hi
@enduml
... generates the following sequence diagram:

To create this image we could proceed as follows:
-
Create file
alice_bob.txtwith the following content:Filealice_bob.txt@startuml Alice -> Bob: Hello Bob -> Alice: Hi @enduml -
Execute the following command in a terminal:
java -jar plantuml.jar -i alice_bob.txt
Note
The above command requires Java to be installed on your system. Moreover file plantuml.jar must be in your working directory.
PlantUML is not the easiest one to install, but it's worth the effort because of its versatility.
For more information see Command line.
-
File
alice_bob.pngis created in your working directory:
Now that we know the basics of PlantUML, let's see how we can use this in PML to dynamically generate many kinds of diagrams by just providing the appropriate text input.
In PML we would use the following markup code to insert an image in a document:
[image source=images/alice_bob.png]By default PML uses directory resources to look for images. As we use path images/alice_bob.png in the above markup code, the image file must be stored as resources/images/alice_bob.png.
Hence, we need to create a script that:
-
creates file
resources/images/alice_bob.txtwith content provided in the document -
executes PlantUML to create file
resources/images/alice_bob.png
Here is the code to achieve this:
[s:script
    ~~~
    const plantUMLCode = `@startuml
    Alice -> Bob: Hello
    Bob -> Alice: Hi
    @enduml`;

    const inputFile = "resources/images/alice_bob.txt"
    fileUtils.writeText ( inputFile, plantUMLCode );

    OSCommand.runAndWait ( [ "java", "-jar", "plantuml.jar", "-i", inputFile ] );
    ~~~
]
As can be seen, we first create the input file with fileUtils.writeText, and then we use OSCommand.runAndWait to execute PlantUML.
The above script creates file resources/images/alice_bob.png, which can then be used like an ordinary image file with:
[image source=images/alice_bob.png]A much better approach, useful if we need to create several images, is to create a reusable function that creates the image and insert it in the document with a call to doc.insert:
[s:def
    ~~~
    function insertPlantUMLImage ( name, plantUMLCode ) {

        const inputFile = `resources/images/${name}.txt`;
        fileUtils.writeText ( inputFile, plantUMLCode );

        OSCommand.runAndWait ( [ "java", "-jar", "plantuml.jar", "-i", inputFile ] );

        doc.insert ( `[image source = images/${name}.png]` );
    }
    ~~~
]
Because this function might be useful in other documents, we can store it in a separate file named PlantUMLUtils.def.
Then we can import the function with an u:ins_file node and use it as follows:
[u:ins_file path = config/scripting/PlantUMLUtils.def]

[s:script insertPlantUMLImage ( "alice_bob_2", `@startuml
    Alice -> Bob: Hello
    Bob -> Alice: Hi
    @enduml` ); ]
Besides state diagrams, PlantUML supports many other kinds of diagrams, such as mathematic formulas and mindmaps.
Note
To use AsciiMath you need to download some files, as explained in chapter "How is this working?" on this page.
Here is a fully functioning example of a PML document, to give you a glimpse of what can be achieved:
[doc [title PlantUML Demo]
[u:ins_file path = config/scripting/PlantUMLUtils.def]
Euler’s Identity, the most beautiful math equation:
[s:script
~~~
insertPlantUMLImage ( "euler_identity", `
@startmath
e^(ipi)+1=0
@endmath` );
~~~
]
Time dilation in Einstein's special relativity:
[s:script
~~~
insertPlantUMLImage ( "time_dilation", `
@startmath
t'=t1/sqrt(1-v^2/c^2)
@endmath` );
~~~
]
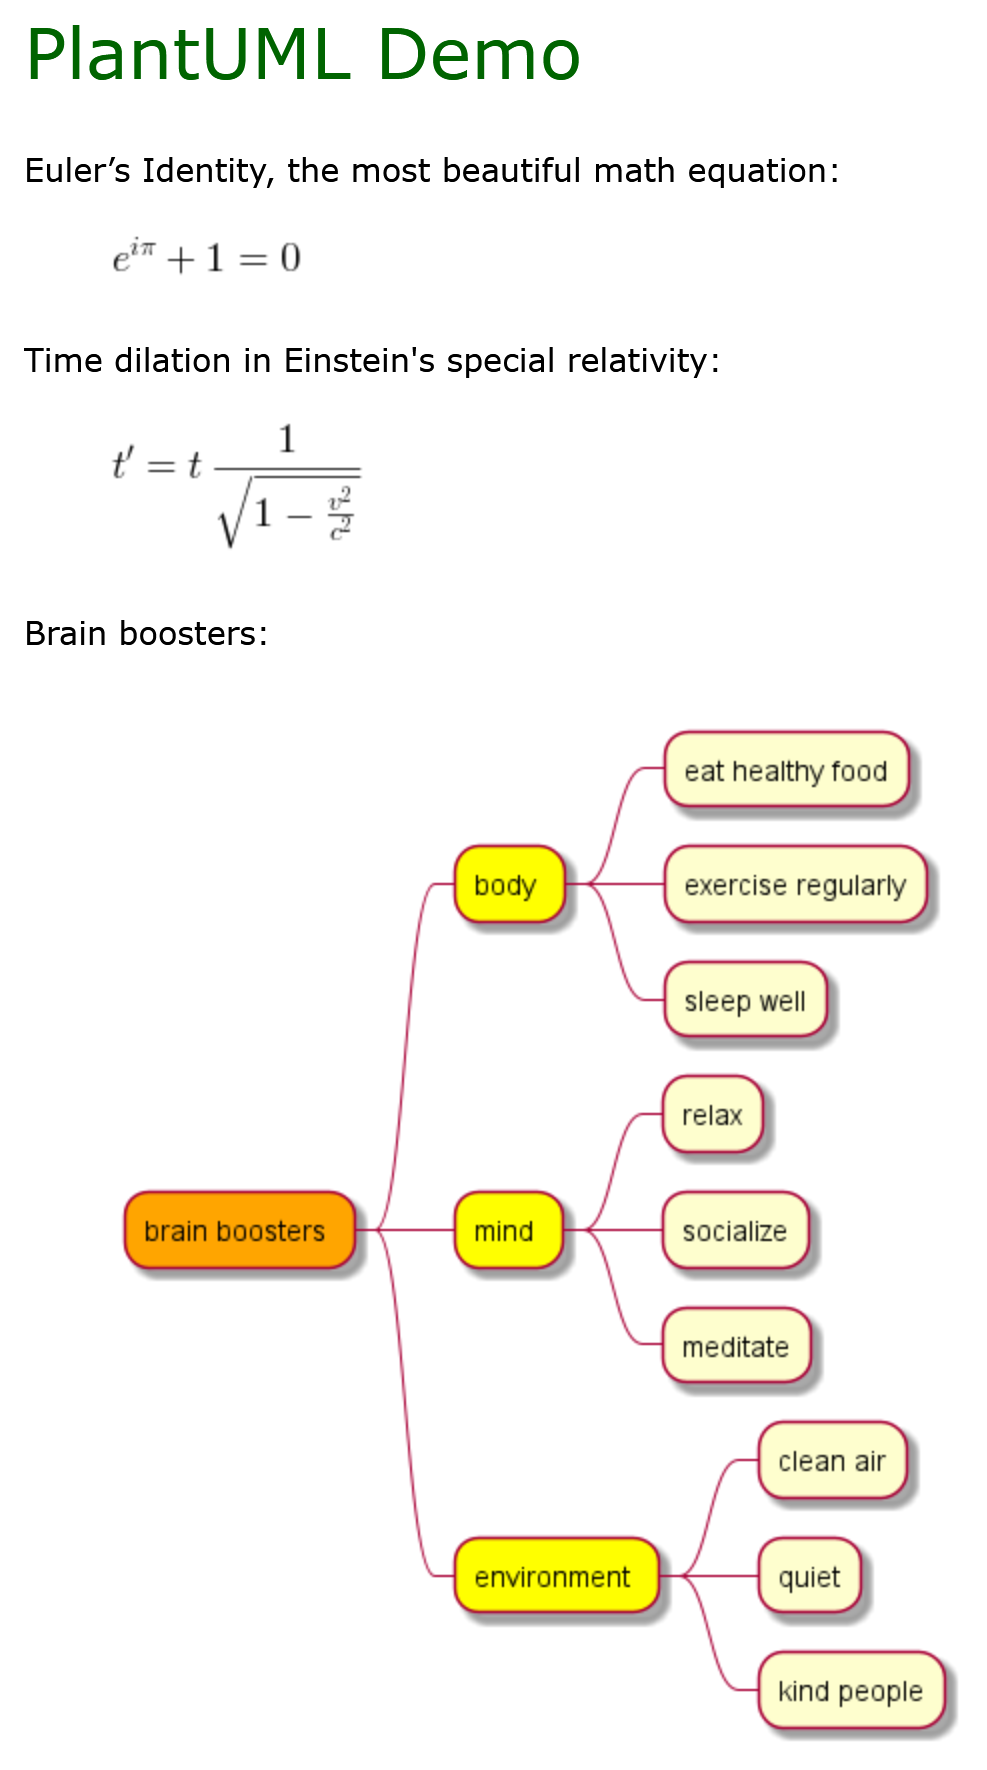
Brain boosters:
[s:script
~~~
insertPlantUMLImage ( "brain_boosters", `
@startmindmap
<style>
mindmapDiagram {
.level_1 {
BackgroundColor orange
}
.level_2 {
BackgroundColor yellow
}
}
</style>
* brain boosters <<level_1>>
** body <<level_2>>
*** eat healthy food
*** exercise regularly
*** sleep well
** mind <<level_2>>
*** relax
*** socialize
*** meditate
** environment <<level_2>>
*** clean air
*** quiet
*** kind people
@endmindmap` );
~~~
]
]
If PML is installed on your system, you can execute the following command to create a HTML file in directory output:
pmlc PlantUML_Demo.pml
Here is the result displayed in a browser:
Executing OS Scripts
Besides executing OS programs, you can also execute OS scripts, by simply providing the OS's script code. This works on Linux and Windows, but you need of course to provide the correct OS-dependent code.
Here is a simple example of inserting the result of a Windows dir command into a PML monospace node:
[s:script
    ~~~
    const cmd = `@echo off
    dir C:\\temp`

    const dirResult = WinCmdUtils.getInstructionsOutput ( cmd, null, null );
    const escapedText = doc.escapeText ( dirResult )
    doc.insert ( `[monospace ${escapedText} ]` );
    ~~~
]
The (truncated) result looks like this:
Volume in drive C is DriveC
Volume Serial Number is A504-9999

Directory of C:\temp

19/01/2022  10:32    <DIR>          .
11/10/2021  13:57                24 example.txt
08/05/2021  11:13                49 c.txt
...
            19 File(s)        220.111 bytes
            3 Dir(s)  630.814.339.072 bytes free
The above code could also be written as a one-liner (NOT recommended):
[s:script
    ~~~
    doc.insert ( `[monospace ${doc.escapeText ( WinCmdUtils.getInstructionsOutput ( "@echo off && dir C:\\temp", null, null ) )} ]` );
    ~~~
]